DocOctober (talk | contribs) mNo edit summary |
|||
| (11 intermediate revisions by 6 users not shown) | |||
| Line 1: | Line 1: | ||
| ⚫ | |||
| − | {{Stub}} |
||
| − | [[File: |
+ | [[File:iconStatusEffects_sleepPenalty.png|150x150px|right|frameless]] |
| ⚫ | |||
== Overview == |
== Overview == |
||
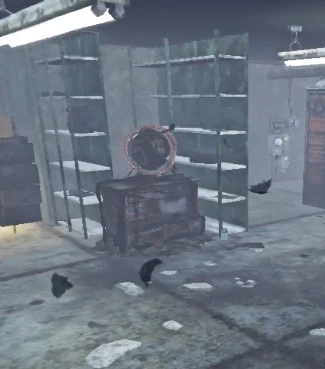
[[File:Alarm Clock.jpg|thumb|right|widths="200" heights="200"|An '''Alarm Clock''' on [[Badham Preschool]]]] |
[[File:Alarm Clock.jpg|thumb|right|widths="200" heights="200"|An '''Alarm Clock''' on [[Badham Preschool]]]] |
||
| ⚫ | If The {{IconLink|Nightmare}} is chosen as the Killer for a Trial, '''{{clr|2|5}}''' '''{{PAGENAME}}''' will appear in random locations throughout the Trial Grounds.<br>They appear as plain white dressers until a {{IconLink|Survivor}} is drawn into the [[Dream World]]; then the '''{{PAGENAME}}''' appear atop the dressers as they become bloodied and dilapidated. |
||
| ⚫ | If The {{IconLink|Nightmare}} is chosen as the Killer for a Trial, |
||
| ⚫ | |||
| ⚫ | Survivors trapped in the [[Dream World]] can use the '' |
||
| ⚫ | |||
| ⚫ | |||
| ⚫ | Survivors trapped in the [[Dream World]] can use the '''{{PAGENAME}}''' as a way to wake themselves up when failing a Skill Check would be detrimental (due to the loud noise notification those create). If a Survivor uses it to wake themselves up, they get a '''{{clr|6|30 second}}''' respite before starting to fall asleep again. |
||
| + | |||
| ⚫ | Once they fall asleep, Survivors will be assigned the farthest '''Alarm Clock''' from their current location. Each clock is intended for one {{IconLink|Survivor}}, with each Survivor seeing the {{IconLink|Aura}} of their specific clock while asleep. Once a Survivor uses it, this Survivor cannot interact with this clock anymore; another clock will be assigned to them the next time they fall asleep. |
||
| + | |||
== Trivia == |
== Trivia == |
||
| − | * |
+ | * Like {{IconLink|Cages of Atonement}} and {{IconLink|Pools of Devotion}}, interacting with '''{{PAGENAME}}''' is not affected by any [[Unlockables]]. |
| + | |||
== Gallery == |
== Gallery == |
||
<gallery mode="nolines" widths="200" heights="200"> |
<gallery mode="nolines" widths="200" heights="200"> |
||
| − | File:Alarm Clock missing.png|One of the dressers on which |
+ | File:Alarm Clock missing.png|One of the dressers on which '''{{PAGENAME}}''' can spawn. |
| − | File:Alarm Clock in action.png|Claudette using the ''' |
+ | File:Alarm Clock in action.png|Claudette using the '''{{PAGENAME}}''' to wake up. |
File:Alarm Clock Aura.png|The Aura of an '''Alarm Clock''', shown in white. |
File:Alarm Clock Aura.png|The Aura of an '''Alarm Clock''', shown in white. |
||
</gallery> |
</gallery> |
||
| Line 27: | Line 29: | ||
[[Category:Props]] |
[[Category:Props]] |
||
| − | [[pt |
+ | [[pt:Despertadores]] |
Revision as of 09:45, 29 July 2020
The Alarm Clocks are one of the 27 Props featured in Template:IconLink that was added with Patch 3.1.0.

Overview
An Alarm Clock on Badham Preschool
If The Template:IconLink is chosen as the Killer for a Trial, 5 Alarm Clocks will appear in random locations throughout the Trial Grounds.
They appear as plain white dressers until a Template:IconLink is drawn into the Dream World; then the Alarm Clocks appear atop the dressers as they become bloodied and dilapidated.
Mechanic
Survivors trapped in the Dream World can use the Alarm Clocks as a way to wake themselves up when failing a Skill Check would be detrimental (due to the loud noise notification those create). If a Survivor uses it to wake themselves up, they get a 30 second respite before starting to fall asleep again.
Once they fall asleep, Survivors will be assigned the farthest Alarm Clock from their current location. Each clock is intended for one Template:IconLink, with each Survivor seeing the Template:IconLink of their specific clock while asleep. Once a Survivor uses it, this Survivor cannot interact with this clock anymore; another clock will be assigned to them the next time they fall asleep.
Trivia
- Like Template:IconLink and Template:IconLink, interacting with Alarm Clocks is not affected by any Unlockables.
Gallery

One of the dressers on which Alarm Clocks can spawn.

Claudette using the Alarm Clocks to wake up.

The Aura of an Alarm Clock, shown in white.


